
🦾 Designing Assistive Technology
Designing Assistive Technology
Objective:
Students will use 3D printing technology to create customized assistive technology devices for individuals with different abilities. They will also learn about different disabilities and how technology can be used to support individuals with those disabilities.
Materials:
- Computer with 3D modeling software (a great resource is TinkerCAD)
- Access to online or other academic resources
- 3D printer and filament (optional)
What is Assistive Technology?
Assistive technology refers to any device, software, or equipment that helps people with disabilities to perform tasks that would otherwise be difficult or impossible. These devices can range from simple tools like magnifying glasses and hearing aids to complex computer systems and specialized software. Assistive technology helps individuals with disabilities to live more independent and productive lives, and can provide them with opportunities for education, employment, and social engagement.
Assistive technology is important because it can help to break down barriers for individuals with disabilities and enable them to participate more fully in society. Without assistive technology, people with disabilities may be unable to access education, employment, or even basic activities of daily living. By providing individuals with the tools they need to overcome their challenges, assistive technology can help to promote inclusion, equality, and independence. Additionally, assistive technology can enhance the quality of life for people with disabilities, allowing them to pursue their interests, participate in social activities, and achieve their goals.
Common examples include:
- Screen readers
- Text-to-Speech and Speech-to-Text Software
- Magnifiers
- Braille displays
- Hearing aids and cochlear implants
- Adaptive switches
- Smart home technology
- Augmentative and alternative communication devices
- Mobility aids
Brainstorming
Check out these websites for inspiration on assistive technology needs and ideas. They offer a range of resources, including case studies and product reviews, to help you discover new ways to support individuals with disabilities.
- https://openassistive.org/
- https://www.disabilityinnovation.com/assistive-technology
- https://www.resna.org/AT-Standards
- https://ncdae.org/resources/articles/technology.php
More ideas include:
- Wheelchair parts
- Hearing aid case
- Tools for hand mobility
- Braille tool, like chess set or picture book
- Fidget toy
- Tactile map
- Adaptive utensil
- Sensory toys
Sketching a Design
Creating a design sketch is a great way to visualize your idea before starting to create it in Tinkercad. Here are some steps you can follow to create a design sketch:
-
Start by sketching out your basic idea. This can be a rough sketch, so don’t worry about making it perfect. Just get your basic idea down on paper.
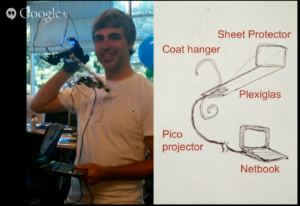
The first Google Glass prototype was built with a coat hanger, sheet protector, plexiglass, pico projector and netbook.
-
Add details to your sketch. Think about what components your design will need and add them to your sketch. You can also add labels or notes to help you remember what each component is.
-
Refine your sketch. Once you have your basic idea and components on paper, take some time to refine your sketch. Think about how the components will fit together and make any necessary changes.
-
Create multiple sketches. Don’t be afraid to create multiple sketches of your design. This will help you to explore different possibilities and refine your ideas.
Implementation – Using TinkerCAD
CAD stands for Computer-Aided Design, which is the use of computer software to aid in the creation, modification, analysis, or optimization of a design. CAD software is commonly used in many fields, such as engineering, architecture, and product design, to create 2D and 3D models that can be used to visualize, simulate, and analyze designs before they are physically built.

To use Tinkercad to create a design in 3D, follow these steps:
- Sign in to Tinkercad and create a new design.
- If you have never used Tinkercad before, there are many tutorials that will show you how to use the platform and create different shapes. This tutorial will walk you through the basics of navigating through adding and editing shapes, and using the snap grid.
- If you are struggling with creating their own designs, you can check out Thingiverse.com or Printables.com to find a starting point for a design. You can then import the file into Tinkercad and edit it to fit their needs.
- Once you have created a design, save it by clicking on “Export” and selecting the appropriate file format (e.g., STL for 3D printing).
- Finally, if you have access to a 3D printer, you can print the design and test it out in the real world. If not, you can still view their design in 3D on the Tinkercad platform or share it with others for feedback.